Introduction
When you’re striving for a perfect ID shot, cutout pro passport photo is your go-to solution. This blog post walks you through everything you need to know about cutout pro passport photo—from preparation to final tweaks—so you can confidently produce a flawless, professional-looking passport photo that meets official requirements.
The Basics of cutout pro passport photo
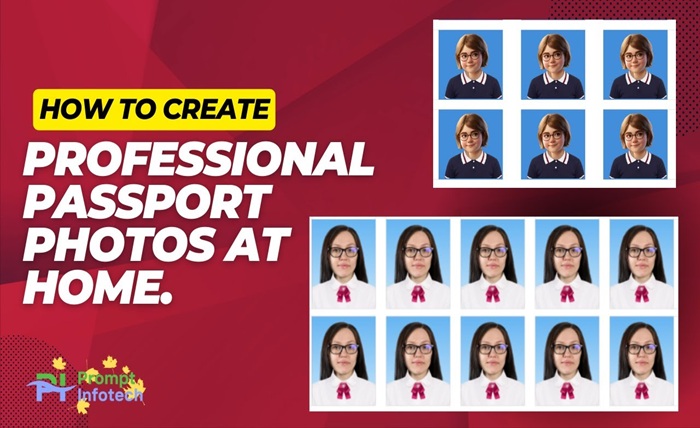
To make the most of cutout pro passport photo, you first need to understand what it is. Cutout pro passport photo refers to the process of isolating your portrait from the background and applying precise measurements, ensuring compliance with passport or visa standards. By using cutout pro passport photo, you ensure your image has the correct head size, proper lighting, and the required neutral background. That foundation makes all subsequent editing easier and more accurate with cutout pro passport photo.
Why cutout pro passport photo Enhances Your ID Application
Using cutout pro passport photo enhances your application by delivering professional accuracy. With cutout pro passport photo, you avoid common mistakes like improper head-size ratio, uneven lighting, shadows, or background errors. The precision of cutout pro passport photo helps ensure your image is accepted by embassies or government agencies, minimizing the risk of rejection. Every detail counts—and cutout pro passport photo brings that essential attention to detail.
Preparing Your Image for cutout pro passport photo
Before applying cutout pro passport photo, start with a high-quality original image. Choose solid, light clothing and a neutral, well-lit background. When you plan for cutout pro passport photo, good lighting and framing—consistent with passport photo standards—are key. A clear, frontal shot with even lighting gives cutout pro passport photo tools the data they need to isolate your features accurately and produce a clean, compliant final version.
Step-by-Step Workflow with cutout pro passport photo
Here’s a typical workflow when using cutout pro passport photo:
-
Upload your original image.
-
Use cutout pro passport photo to remove the background.
-
Ensure the head-height-to-photo-size ratio complies with specs.
-
Apply background—usually pure white or light gray—with cutout pro passport photo.
-
Fine-tune exposure and color.
Each step relies on cutout pro passport photo to guide and enforce the strict requirements needed for official documents.
Tips and Tricks for Optimizing cutout pro passport photo
To get the best results from cutout pro passport photo, follow these tips:
-
Start with a clear, well-lit original photo.
-
Wear clothing that contrasts slightly with your skin tone.
-
Keep a neutral expression—eyes open, mouth closed—before cutout pro passport photo processing.
-
Check that the software measures and centers the head correctly during cutout pro passport photo editing.
-
Review post-processing to ensure no outlines or shadows remain.
These tips help cutout pro passport photo deliver that crisp, compliant final image you need.
Common Issues Solved by cutout pro passport photo
Many problems plague passport photos: background shadows, uneven lighting, hair blending with background, and improper sizing. Cutout pro passport photo excels by detecting and eliminating background artifacts, enforcing head placement, and providing a clean backdrop. With cutout pro passport photo, you avoid background inconsistencies and ensure the technical specifications are met, giving your application a smooth path to approval.
Final Quality Check with cutout pro passport photo
After processing, perform a final quality review using cutout pro passport photo:
-
Confirm head height occupies the right percentage of the frame.
-
Check eye level is within the specified zone.
-
Verify background is uniformly neutral.
-
Ensure no shadows or editing artifacts remain.
-
Validate colors and skin tones look natural.
A rigorous final check through cutout pro passport photo ensures your photo adheres to official guidelines and is ready for submission.
Conclusion
Using cutout pro passport photo makes all the difference when crafting a compliant, professional passport or ID photo. From the outset—with clean lighting, neutral backgrounds, and good framing—cutout pro passport photo helps refine every detail to meet strict standards. Its capabilities in background removal, sizing accuracy, and final quality assurance empower you to produce a photo that border authorities will accept without hesitation. Make cutout pro passport photo your trusted tool, and you’ll avoid rejections and stressful reshoots—saving time and giving you peace of mind.
FAQs
1. What does “cutout pro passport photo” mean?
“Cutout pro passport photo” refers to a method or tool that removes the background from a portrait and ensures the image meets official passport or visa photo criteria—setting head size, centering, and background neutrality.
2. Is cutout pro passport photo suitable for all countries?
Yes, because cutout pro passport photo is designed to enforce general guidelines—like head size ratios and neutral background—that are common across most countries’ passport photo requirements. You may still need to adjust specific dimensions based on your target country.
3. Can I use cutout pro passport photo on a smartphone?
Absolutely. Many cutout pro passport photo tools are mobile-friendly or app-based, allowing you to take a photo and process it directly on your phone with the same precision as desktop versions.
4. What resolution should I use for cutout pro passport photo?
Start with a high-resolution image—at least 300 dpi, ideally in JPEG or PNG format. Cutout pro passport photo works best with clear, detailed images so that edges and features are accurately detected.
5. Is there a cost to using cutout pro passport photo tools?
That depends on the provider. Some cutout pro passport photo services offer free basic background removal and sizing tools, while advanced options (higher resolution, batch processing, auto-formatting) may require a paid subscription or one-time fee.