“draw kleki” might initially raise eyebrows—is “Kleki” a character, a style, or a tool? In digital art, Kleki refers to Kleki.com, an intuitive browser-based digital drawing tool that’s ideal for both beginners and experienced creators. When you draw kleki, you’re utilizing a web canvas offering layers, brushes, blending, and even a bit of Photoshop-esque functionality—without downloading software. This introduction grounds your creative journey: when you draw kleki, you tap into a seamless platform that marries accessibility with capability. Whether your goal is sketch, line art, digital painting, or experimenting with textures, learning how to draw kleki sets you up for dynamic art creation.
Draw Kleki – Getting Started: Accessing and Navigating the Interface
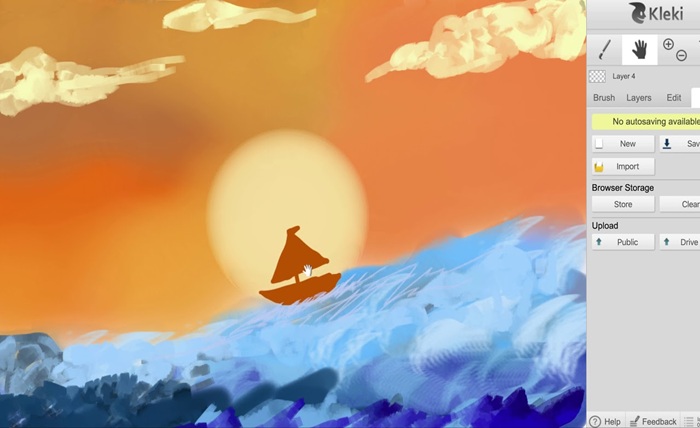
To draw kleki, head to [kleki.com] in your browser (no install needed). The interface is minimal but powerful: a toolbar on the left, canvas center stage, brush and layer panels on the right. When you draw kleki, you’ll want to first familiarize yourself with tool icons—brush, eraser, eyedropper, smudge, fill, and the handy undo/redo buttons. The top menu allows canvas resizing and saving your work as PNG or layered PSD. Every time you draw kleki, start by choosing your canvas size—say 1920×1080 for a standard digital canvas, and set background transparent or white depending on whether you’d like to do line work or fully painted art. Understanding the interface is the first crucial step to effectively draw kleki.
Draw Kleki – Tools and Brushes: Choosing Your Creative Weapons
When you draw kleki, selecting the right brush is everything. Kleki offers basic brush styles—hard round, soft round, pencil, marker—with adjustable size, opacity, flow, and hardness. As you draw kleki, test out low-opacity soft brushes for painting and shading, switch to hard round for crisp lines, or pencil-style brushes for sketching. The eraser doubles as a negative space brush—when you draw kleki, use it creatively to refine shapes. You’ll also find blend or smudge tools perfect for soft transitions. You can even simulate textured effects by adjusting jitter or scatter, letting your every draw kleki session feel unique. Understanding and experimenting with tools sharpens your digital art workflow.
Draw Kleki – Layer Management: Organizing Your Work Efficiently
Another essential to draw kleki successfully is mastering layers. When you draw kleki, think of layers as transparent sheets—sketch on one, line art on another, colors on a third. Label layers like “Sketch”, “Line Art”, “Base Color”, “Shadows”, and “Highlights” to stay organized. You can hide layers, change their opacity, and reorder them as you draw kleki, giving you flexibility. If you make a mistake, you can just delete or adjust a single layer rather than redoing everything. Layer blending modes—like Multiply for shadows, Add (linear dodge) for highlights—supercharge how you draw kleki, making your art more dynamic and polished without complex workflows.
Draw Kleki – Workflow Tips: From Sketch to Finished Artwork
Creating a polished piece when you draw kleki involves a clear workflow. Start with a light sketch on a low-opacity layer. Then when you draw kleki, refine your sketch with a clean line layer—keeping sketch layer visible but faint helps guide your strokes. Next, block in flat colors (“draw kleki” means layering in base colors), then add shadows—when you draw kleki, use Multiply blending and low opacity soft brush. Then render highlights—when you draw kleki, consider clipping masks (though Kleki doesn’t support them natively, you can paint highlights on a new layer and then erase beneath). Finally, add texture—when you draw kleki, lightly stipple or splatter with a textured brush, add glow, maybe a soft overlay for atmosphere. That complete process—from sketch to final tone—is how to draw kleki like a pro.
Draw Kleki – Creative Inspiration: Ideas to Spark Your Digital Projects
Looking to draw kleki but stuck for ideas? Here are a few prompts to fuel your creativity:
-
Fantasy landscapes: When you draw kleki, paint misty forests, glowing moons, or rocky vistas.
-
Character portraits: When you draw kleki, experiment with expressive eyes, stylized hair, dynamic poses.
-
Everyday objects with personality: When you draw kleki, turn a coffee mug or plant into a character with whimsy.
-
Fan art or reinterpretation: When you draw kleki, pick your favorite character and reinterpret in your style.
-
Abstract light and color: When you draw kleki, play with color gradients, light leaks, and dreamy shapes.
Use these themes to spark your creative practice: the more you draw kleki, the smarter your artistic intuition becomes.
Draw Kleki – Advanced Techniques: Elevating Your Digital Art
Ready to level up your draw kleki game? Try these advanced techniques:
-
Custom brushes – Although Kleki doesn’t let you import brushes directly, you can simulate custom textures by using scatter and shape jitter settings. When you draw kleki, adjust settings until you get foliage, skin grain, or painterly texture.
-
Reference layering – When you draw kleki, open a reference image in a separate window and use the eyedropper to sample colors directly onto your canvas.
-
Gradient mapping – Although Kleki lacks a gradient map tool, you can fake it: when you draw kleki, paint gradients manually using low-opacity brushes and soft blending.
-
Photo texture overlays – When you draw kleki, you can draw brush strokes to mimic overlaying a photo texture—paint subtle dots or specks to emulate grain or texture.
-
Light and glow effects – When you draw kleki, set a new layer to Add (linear dodge) or Overlay, and paint glow using a soft round brush with low flow for light effects like neon, magic, or firefly mood lighting.
These techniques show that when you draw kleki, you can still explore depth and complexity even within a simplified toolset.
Draw Kleki – Saving, Exporting, and Sharing Your Artwork
Once you’ve finished and your art is immaculate, it’s time to draw kleki … and then to save and share. When you draw kleki, click the Save icon: you can download as a flattened PNG or, even better, as a layered PSD (depending on features at that time). The PSD option is great—if you want to further edit in Photoshop or Krita, when you draw kleki and save as PSD, your layers come alive. For sharing, you can upload your PNG to social media, artists’ communities, or your website. When you draw kleki, remember to add tags like #KlekiArt or specific content tags, and consider uploading your PSD to communities like DeviantArt or Behance for critique. Saving and sharing is the final—and satisfying—step after each session of you drawing kleki.
Conclusion
Draw kleki is a versatile and accessible way to practice digital art directly in your browser—no downloads, no fuss. Starting out, you draw kleki by familiarizing yourself with the canvas and tools. As you get comfortable, you explore brushes, layers, and workflow, layering sketch, color, and texture with ease. When you draw kleki, you’re not just learning a tool—you’re building artistic habits: sketching quickly, keeping files organized, experimenting with lighting, and sharing your creations. As you continue to draw kleki, you’ll refine both technique and creative voice. Embrace the freedom the tool offers, explore your ideas, and make digital art an everyday practice. Now go ahead—draw kleki and create your next masterpiece!
FAQs
Q1: What does “draw kleki” mean?
When people say “draw kleki,” they refer to creating digital art using the browser tool Kleki (kleki.com). It means drawing with its brushes, layers, and tools directly in your browser—no installation required.
Q2: Do I need to create an account to draw kleki?
No account is required in most cases. You can draw kleki immediately by visiting the site, though creating an account may help with saving and managing your artwork, depending on updates. But fundamentally, you can draw for free, instantly.
Q3: Does “draw kleki” offer pressure sensitivity support?
Kleki supports basic pressure sensitivity if you’re using a compatible drawing tablet. When you draw kleki, your tablet’s pressure data controls brush size or opacity—though the effect may be more limited than in full-featured apps.
Q4: Can I export my art after I draw kleki?
Yes! After you draw kleki, you can export your work as a PNG image, and in many versions, export as layered PSD, allowing further editing in software like Photoshop, Affinity Photo, or Krita.
Q5: Is “draw kleki” good for beginners?
Absolutely. When you draw kleki, you get a straightforward interface with essential tools—perfect for beginners learning digital drawing, practicing sketching, or just experimenting with colors and lighting, before moving on to more complex software.